Are We There Yet? Part III:
The Role of the Ink Jet Printer
by Harold M. Merklinger
You’ll recall that I was hoping to prove that the arrival of a 36 megapixel digital camera would resolve my issue of b&w digital photography not being as good as traditional 35 mm b&w film and printing paper. I even thought I had proved it. But then I got bogged down in the quicksand of the digital detail. If it can go wrong, well you know the rest. Yes, I am satisfied that the Nikon D800E camera, along with a good lens used appropriately, is capable of capturing at least as much b&w image detail as the best 35 mm b&w films. But in the final test of producing that 16 by 20 in b&w print, the great stumbling block was my printer. It’s an Epson 3800, but the manufacturer probably may not be at fault. It’s the digital method.
Looking back on things, I should really have known better. I have known about ink-jet printer limitations since before I had a digital camera. But ink jet printers have become so good for printing colour images and the problems with b&w printing are so varied that I had almost forgotten: ink-jets erase detail. And it’s by design. The consequences of not doing it are so severe that we would complain even louder about the banding. It’s not quite that simple, but that is the main theme of the story. I even wrote about all this here several years ago (2004-2005). Since that earlier testing with black and white printing I've been happily using the black and white mode of the Epson 3800. As we have seen, it is not perfect, but it is quite good - and it's easy to do.

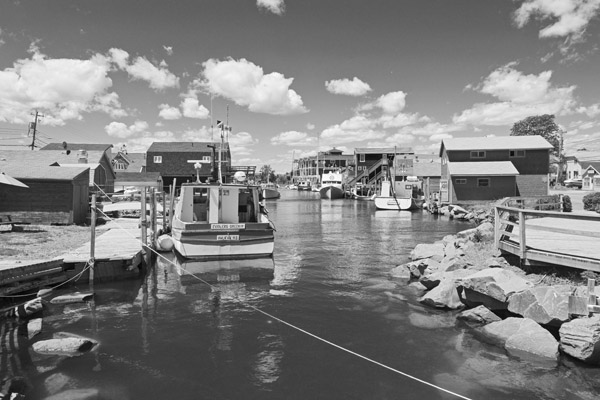
This Nikon D800E image tricked me into believing that we "had arrived" by providing high-contrast (near black on near-white) detail that my Epson 3800 can print with good fidelity.
I don’t know all the details of digital ink-jet printing, but I’ll try to explain some basics. The manufacturers have worked out really smart ways to deal with many of the problems that arise, but in the end we just run out of dots.
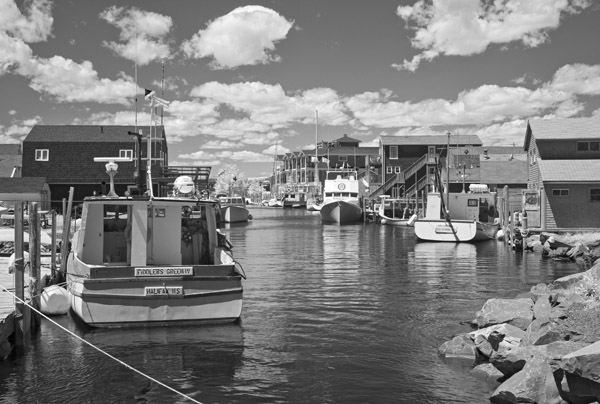
When I tried to repeat the initial success, the lower contrast detail - much of it in the shadows - prevented this D800E image (ISO 160, 1/500 sec, 24-70/2.8 at 28 mm and f/10) from coming out any better than the same sceen photographed with a Leica M9 - a camera with half the pixel count.
Start with a really big sheet of graph paper – linear graph paper ruled with lots and lots of small squares. Now count off and darken every sixteenth line both horizontally and vertically. You should now have a big sheet of square blocks, each block containing 256 smaller squares. In each block of 16 by 16 squares, start numbering the small squares, starting in the middle with number 255 and work down in a spiral, 254, 253 etc until with 0 you should have every small square filled in. It doesn’t matter if you got it a little wrong, just so long as every square has a number and no number is repeated within a block. Now fill in all the other 16 by 16 blocks in the same way. Then, get your image data and overlay that pixel-for pixel on little square by little square. You may have to interpolate (res-up) your image to achieve one image pixel for every little square. Your image data pixel will contain a number between 0 and 255. That’s for a black and white image. If you have a colour image, you’ll have to do this for every colour of ink that you plan to use. We’ll keep it simple: we’ll only use black ink for now. Compare the numbers little square by little square, for your graph paper and your image data. If the number on the graph paper is less than the corresponding image number, blacken just that little square. If the number in the little square is equal to or greater than the image number, just leave the little square unfilled. Do that for all the little squares. When you are done, look at your graph paper and you should see your image, rendered in a gray-scale half-tone. That’s basically how your ink jet printer works.
This job is pretty simple for computers and ink squirters to do. But there’s something special about the result. The end picture is something akin to the traditional half-toning done for newspaper photos, but it actually can be somewhat better. If your image consisted of just 0s and 255s you will end up with a perfect copy of the image. There is no loss of image data or resolution. On the other hand, if the image data is all just 254s and 255s, you will end up with at most one blackened little square in each block of 256 little squares: most of the image data has vanished and the image resolution is at best one-sixteenth that of the original (and just like the traditional newspaper half-tone)!
The typical ink-jet printer these days is somewhat more sophisticated: the numbers on the graph paper get randomized in position, the blocks of number get re-positioned and overlap etc., but the basic result is the same. Ink jet printers give us high resolution images where contrast is high, poor resolution where contrast is low and lots of missing information in the lighter tones.
For b&w ink-jet printing we can use multiple shades of gray ink to help the situation, but ultimately we run out of dots. To reproduce the original image perfectly we need 255 shades of gray ink. That’s just not practical today.
My one b&w printing success – being able to read “Kurt & Kylie” on the fishing boat – was permitted because it was 85% black lettering on an almost white background: just what we need for near-perfect full-resolution printing.
For now there’s really only one solution to the problem: print bigger. What we need to do is to increase the size of the image (or decrease the size of all those little squares) until one original image pixel accounts for one 16 by 16 cell of the printer. In that case each cell should (on average) perfectly reproduce the tone of the image pixel. For me, today, my Epson 3800 does not spray small enough dots for the maximum size of the paper. I need either a higher resolution printer, or a printer of the same resolution but making larger prints. In the case of the Nikon D800E and the 2880 dot per inch printing resolution of the Epson 3800, I really need to be making prints 26 by 40 inches in size. At that size the 3800 would be able to print all the data from the D800E. Unfortunately the 3800 is limited to paper of 17 by 22 inches. I did try printing a letter-sized portion of the "Kurt & Kylie" file sized to 26 by 40 inches (180 ppi) and it did indeed print nearly all of the highlight and low-contrast detail. I also tried various resolution-reductions set before printing as well as additional Epson printer driver settings. Setting "Finest Detail" in the printer driver amazingly permitted "Kurt & Kylie" to be read even in a 10 inch wide print, but seemingly at a slight expense of highlight detail. Setting the resolution to 360 dpi before printing seemed to give a very slight improvement in highlight detail, but it was not really significant - I could be imagining it.
To check out the "print bigger" solution, I printed the "Kurt & Kylie" image on two sheets of 17 by 22 inch paper and taped the two halves together: a print roughly 21.5 inches by 33 inches. It does indeed do much better in the highlights at that size than in smaller prints. Not all the highlight detail is there at that size but it certainly is unmistakenly better. I also sized the file for 26 by 40 inches and printed letter-sized portions of it. At that size, yes, pretty much all the detail is there!
I also had two prints made on chromogenic (dye-based, colour) printing paper: one at 16 by 24 inches and another at 24 by 36 inches. Although the image tone was neutral, the prints were rendered at a lower level of contrast than is appropriate for black and white. The end result was that I did not really like these prints nearly as much as the 21.5 by 33 inch ink-jet print.
I also made a 12 by 18 inch print on an Epson 1400 dye-based printer. I didn't really care for the overal image tone or the slight variations in it, but highlight and and detail-wise, it was as good as a 14 by 21 inch print from the 3800. The Epson 1400 prints at 1440 by 5760 dpi compared with the 1440 by 2880 of the 3800.
As hinted earlier, the other side of this story is that other possible ink-jet printing schemes that could yield higher resolution and/or tonal accuracy generally also lead to noticeable ‘banding’ in the print. Skies and smooth gradients print with a clear linear boundaries between adjacent tones which the eye tends to see as a bunch of parallel lines. The softening effect of current ink-jet methods smooths the gradients nicely. And that is important – perhaps more important than erasing some minor detail.
Of course these “problems” are also present in ink-jet colour printing, but I find them to be of somewhat lower overall consequence. Yes I still have issues with highlight rendition, but in a colour image that seems to have a less detrimental impact on the final result that it does for the b&w image.
“Print sharpening” does indeed help, but it needs to work a bit differently for each printer, each print resolution and every size of print, or things can get to looking a bit messey. And a file that has been thus optimized for printing for a particular size and a particular printer will probably look rather poor viewed on screen, or printed on a different printer.
This infra-red photo taken almost as an afterthought with a 10-megapixel Leica M8 reminded me that detail and resolution are not everything; tonalities are also an important factor in b&w images.
Are we there yet with b&w digital photography? My final conclusion is that I believe we are there in so far as the camera is concerned with the Nikon D800E, but the ink-jet printer needs further development. We are "there" for high-contrast detail, but low-contrast detail and highlight texture tend to be supressed. With the Nikon D800E and a good lens in hand we can produce some really good large b&w prints. Those 26 by 40 inch prints probably will be better than could have been done with 35 mm film. But the making of gem-like smaller prints (like 8 by 10 inch contact prints) requires someting better than current ink-jet technology. I note with iterest that in conjunction with the Leica M Monochrom, Leica is promoting a printing service based on traditional b&w printing materials. The service is said to be provided through WhiteWall in the UK, but I see no details of the service on the WhiteWall web site. So no, I am not "there yet" with my 3800. There probably are other printers out there that do better than the 3800, but I have no experience with them.
Link back to Merklinger's Photo Books index page.