My interest in the Minolta ScanElite 5400 arose primarily from a desire to be able to deal with black and white negatives in the digital domain. Black and white emulsions typically support two to three times the resolution of colour materials and hence the 2700 pixel-per-inch resolution of many 35 mm slide/film scanners is not adequate. A secondary appeal was the claim for wide dynamic range: the ability to scan dense slides. On both these issues the ScanElite 5400 does very well. At the same time I cannot give this scanner and its associated software high marks for general use. It is a mixture of good and bad: capable of producing high quality results but requiring a lot of understanding and manual intervention.
Please note that this review applies to the original Minolta Dimage Scan Elite 5400, not the Konica-Minolta Mk II scanner of similar specifications released in 2005.
The basic scanner and software requires Windows 98 or Mac OS 8.6 and later. To use the Firewire connection requires Windows 2000, Me or XP or a Mac with 8.6 or later, plus, of course, a Firewire card if the computer does not have native Firewire ports. Alternatively USB 1.1 or 2.0 can be used. Some of the software features require a minimum of 256 MB of RAM with double that being recommended. In my testing I used the Firewire connection with Mac OS 9.2 on a dual G4 machine with 1.5 GB of RAM.
This scanner is typical of many other 35 mm scanners in that it is a long narrow brick on edge: about 6.5 inches high by 14 inches deep and narrower than most at 2.5 inches. The narrow width suits my situation well: I was able to position it next to my monitor without having to move any items on my desk. The scanner is loaded from the front using either of two supplied holders: one for four mounted slides and the other for a strip of 6 24 by 36 mm frames. There is no holder for APS film. And there is no provision for non-standard frame sizes. The scanner has an external 'brick' type power supply with the small 'brick' being part of the plug at least for North American users. The slide holder has one position that can be loaded without removing the carrier from the scanner. Although the instruction manual says the scanner will not work with glass slides, I found that glass slides fit the holder and could be scanned just fine. Cardboard-mount slides were held well, but the cardboard mounts themselves do a poor job of keeping the film flat. I found the film strip holder a bit tricky to load, but it did an excellent job of holding the film strip flat. A single slide removed from a cardboard mount was, unfortunately, held no flatter than it would be in a plastic slide mount.
There seems to be a general trend these days towards poor printed documentation of equipment and I found this scanner to largely follow that trend. There is a very slim hardware manual and a somewhat better Dimage Scan software manual, but I found both to be inadequate. The software manual covers a range of scanners and it is not clear what specific features of the software will do, or with which scanner it will work. I never was able to figure out what "PixelPolish" did other than perhaps add extra time in the scanning process. And the hardware manual was simply inadequate. It does tell one, however, that the Digital ROC and Digital GEM functions of the Dimage Scan software will not work with this scanner. Initially, I thought my scanner was malfunctioning. When I tried to place a loaded slide holder in the scanner, all I got was a beep. Based on the instructions, I expected the slide holder to be drawn into the scanner, and I interpreted the beep to be an error signal. Eventually I discovered the beep indicated the holder was properly accepted by the scanner. The holder would be drawn into the scanner only when scanning actually commenced. There is no reference whatever to the beep in the manual. You may detect here that one of my concerns is that some hardware issues are described in the software manual and vice versa. When trying to solve a problem, one must read both from cover to cover.
A notable exception to my general comment on documentation is that the software booklet includes a listing of the names and locations of all files installed by the installer. Every software manual should do the same.
A copy of Adobe's Photoshop Elements is included. I presume there is documentation on the CD provided with that program, but I did not even unwrap 'Elements'. The hardware manual warns that the 16-bit scanning mode is incompatible with Photoshop Elements. My interest in Elements ended right there!
In the remainder of this review I will comment on specific features of the scanner and then make a final general comment.
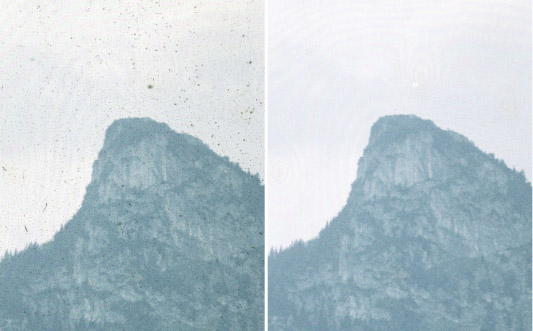
This scanner and associated software do support Applied Science Fiction's "Digital ICE" algorithm for dust and scratch removal. Although using this feature significantly extends the time required to scan a frame, it is usually a worthwhile investment of time. Doing the spotting job manually will often take considerably longer. This featured worked well, often doing a better job than I could have done manually. It was not perfect, and minor follow-up spotting was sometimes required. I also found that this feature seemed to work better in transparency scanning mode than in colour negative scanning mode. That is, the Digital ICE did a better job cleaning up a colour negative if it was scanned as a slide than if scanned as a negative. Contrary to the manual and what I have read in other reviews, I also found Digital ICE did work with my old Kodachrome slides. As advertised, it did not work with conventional black and white negatives. If I told the scanner it was scanning a colour transparency (whereas it was really a b&w negative), and turned on Digital ICE, the algorithm did a mediocre job of removing dust and scratches and also created artifacts such as a diagonal line across the image. I thought perhaps that the warning not to use the scanner with glass slides might mean simply that Digital ICE would not work with glass slides, but as can be seen from the example, it worked just fine. Now if only it could also remove newton rings!
Here's a scan of an old, uncleaned, Agfacolor reversal film, glass-mounted slide taken somewhere in the Alps in about 1956. The whole image and the enlarged detail at right were obtained using Digital ICE. The detail at left was obtained with Digital ICE turned off. Except for one dense spot above the top of the mountain, Digital ICE did a near-perfect job. Too bad it could not do something about those newton rings too!
Let me say simply that the claim for 5400 pixel-per-inch resolution appears to be completely valid. My scans of B&W negatives were everything I had hoped for. To illustrate, the example compares a direct scan of a Kodak Technical Pan negative with the scan of a print I made several years ago using a three-stage process to achiever about 200x magnification. (First I used a 35 mm macro lens and bellows to make a 6x positive, then I used an enlarger to make about a 10x film negative of the positive, and finally a 4x enlargement of the second negative.) Of course, the scanner must be focused accurately to achieve the 5400 ppi.
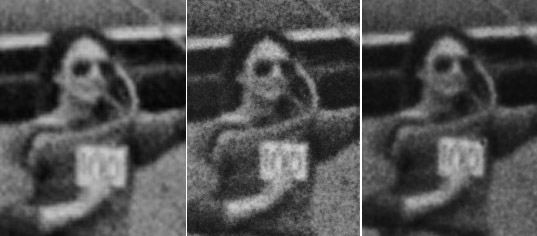
Here's a comparison of a ScanElite 5400 scan of a Kodak Technical Pan negative (left) with a scan of a print made in three stages of enlargement the conventional way (center) and direct digital macro photo (bellows with 20 mm lens) of the negative (right). The direct scan has been 'rezed-up' by a factor of three using the bicubic algorithm in Photoshop in order to make the image more easily viewable on the web. No sharpening has been applied. Please recognize that you are viewing a very small portion of an image about 17 feet wide and 26 feet high about 200x magnification! For most purposes, the 5400 ppi scan should be adequate. The original photo was taken with a Leica M3 and 50 mm 50/2 DR lens focused at infinity. The subject is 100 metres from the camera hence the sign she's holding.
The scanner offers both manual and automatic focus. At least on my sample, the autofocus feature is a near-complete failure. The scanner autofocused correctly only in about one in twenty tries. Often the focus was so bad that the small, on-screen, "pre-scan" image of the whole frame was obviously out of focus. There are two ways to do manual focus, and fortunately, both work. One designates a spot in the pre-scan image on which to focus. One is then presented with a dialog box containing a simple bar graph. The black bar shows the currently measured image contrast, while a white background bar shows the range of contrasts that have been encountered during the adjustment process. Depending upon the method chosen to adjust the focus, one either turns the focus knob on the front of the scanner, or uses the computer mouse to click on on-screen focus controls to ensure that the black bar completely covers the white one. There is some backlash in the knob control, but either method of manual focus works well. I did encounter what I consider to be a non-critical software bug. Every time one has adjusted focus or even canceled a focus operation the software insists on doing another pre-scan. This just wastes time.
The software provides for scanning colour negatives, but, like every other colour negative scanning program I have used, it does not allow sufficient dynamic range to scan the negative properly. There are brightness and colour adjustments possible, but I could never get shadow detail without blocked highlights or open highlights without blocked shadows. The work around is to scan as for a colour transparency and do the reversal in Photoshop.
I tend to find also that most automated scanning utilities fail to provide sufficient dynamic range when scanning positive images also, although the success rate is higher for transparencies than it is for colour negatives. Fortunately it is possible to scan in 16-bit (per colour) mode and with manual exposure control. I found the dynamic range possible with this scanner to be excellent. Several slides that had proved too challenging for other scanners (even averaging multiple scans) were scanned successfully with the ScanElite5400 in a single pass. Averaging multiple scans is possible with this scanner but none of my trial samples needed such treatment.
Of course the software provides for all sorts of adjustments: for cropping, resolution, exposure, contrast, tone curve, colour, sharpening etc. But I generally prefer just to make a full-image, full-range 16-bit scan and then do the rest in Photoshop.
When doing multiple scans, this scanner appears to scan a single line multiple times then move to the next line. Some other scanners scan the complete image in one pass, then repeat the whole-image scan. From a noise perspective I expect scanning the whole image multiple times is better, but it can lead to image registration problems: the successive scans may not be in perfect register. Although I tried it, I did not find it necessary to exploit this feature. That is, the result from multiple scans was not significantly better than from a single scan, even with dense slides. But certainly no worse either.
The manual states "PixelPolish makes automatic or custom image corrections". It cannot be used, apparently, with b&w film or in 16-bit mode. In my experience, scans with and without PixelPolish turned on were indistinguishable. Basically, I have no idea what it is supposed to do that the other controls provided cannot do.
Another option is "Grain Dissolver". We can guess what it is supposed to do. The software manual says that the scanner inserts "a diffusion plate in front of the light source to optically minimize the effect of grain". In the few samples I tried, I could not see any difference with it on or off. But then I think I read somewhere perhaps the Konica-Minolta web page that the Grain Dissolver is automatically applied in many cases even when one has not specifically selected it. The software manual says it is used automatically whenever Digital ICE is selected.
The times required to scan 24 by 36 mm 35 mm images at full resolution were a little longer than the advertised 60-70 seconds, but this time does not include the extra time needed for internal calibration, auto-exposure setting, moving to the selected area, to carry out some of the optional extra features, or to write the image to disk. Thus typical scan times are somewhat longer: perhaps exceeding 100 seconds for a full scan cycle. One trial scan with PixelPolish and Digital ICE both switched on took closer to 10 minutes. And, of course, multiple scans can take even longer. On the other hand, scans of a small portion of a slide can be very much shorter. Batch scanning is possible, but given the focus problems, I did not even try it.
The scanner and software are colour-management aware. One can specify any one of about 10 output colour spaces as well as a monitor profile. It is not clear to me whether the output file is converted to the specified output space or simply tagged with the appropriate profile.
The scanner comes with the usual 1-year warranty. There is one difference, however. If warranty service is required, the warranty period for replaced parts is automatically extended, if necessary, to at least 6 months from the date of the warranty service. My scanner did require warranty action: the power supply failed after about 7 months, and was replaced. My only complaint here is that it took 5 weeks to obtain the replacement power supply.
This is basically a good scanner, with the exception that the autofocus feature simply does not work on my sample, at least. I believe it does deliver the promised resolution and dynamic range. It cannot be described as speedy, but with manual focus intervention it gets the job done. I found the scanner a little more capable than specified, in that it did seem to work fine with glass slides, and the Digital ICE feature did seem to work with Kodachrome. It does give me the ability to scan high-resolution black and white negatives and dense slides that I was looking for. Focus is actually a problem in two ways: 1) the autofocus feature does not work, and 2) the depth of field in the scanner is not adequate for scanning many cardboard-mounted slides. With non-flat slides, one must simply choose what part of the image to make sharp and live with the consequences. If this is a problem in future, I'll be tempted to mount the slide in a glass mount. I'll try using anti-newton ring glass, but this is a condition I did not actually test for this review: it might not work.
The bottom line is really that, yes, this scanner will capture essentially all the detail there is to be obtained from 35 mm black and white negatives.
Back to Digital Black & White page.
Back to Main Page Table of Contents.