Are We There Yet Part II:
Equipment and Software Frustrations
by Harold M. Merklinger
Based on early calculations (early 1990s) I had estimated that a digital camera of about 35 megapixels should be capable of producing prints equal to those of the best black and white 35 mm films. Now that the Nikon D800 with its 36 megapixel sensor is widely available, I thought I would test my prediction. In early tests – my 70th shot with the camera – I thought I had proved my point. In the course of trying to reproduce this singular success, however, I got mired in quicksand. Nothing was working out as I had expected.
The original shots with my New D800E utilized the only AF Nikkor I still possessed: a 50/1.4 AF Nikkor (not even the “D” version). It proved to be a superb lens. I like to do testing using the sorts of pictures I usually take. I find it hard to relate arbitrary resolution tests to real expectations. And what I really care about are actual results that I can understand easily. My usual resolution test often comes down to whether or not I can read some distant street sign - as utilized in Part I. I wanted to use a variety of focal lengths as I normally do, and so I thought the 24-70/2.8 Nikkor should be a more useful tool. I do harbour some reservations where it comes to the quality of zoom lenses, but things are getting ever better, with some recent zooms being cited as better than their equivalent prime lenses.
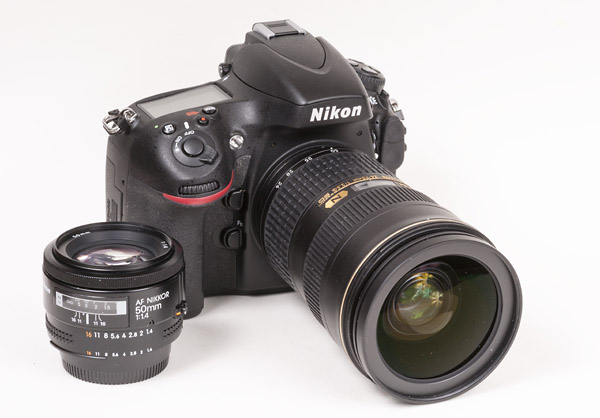
Here's the main 'hardware' used in this testing: a Nikon D800E, an AF Nikkor 50/1.4 and an AF-S Nikkor 24-70 2.8G ED.
Now please let me take half a step backwards in time. My “best” digital camera to date has been the Leica M9. The M9 reliably gives me better and more detailed colour images than I have ever taken before, even with 645-format film cameras – the largest format I have previously used with colour film. My larger format experiences have all been exclusively with b&w film. I have tried converting many of my M9 images to black and white, but have never found that they compare favourably with my past 35 mm slow-film experiences. They come close, but do not exceed the film standard. Maybe the Leica M Monochrom will rectify that, but I'm not about to spend $8000 to find out.

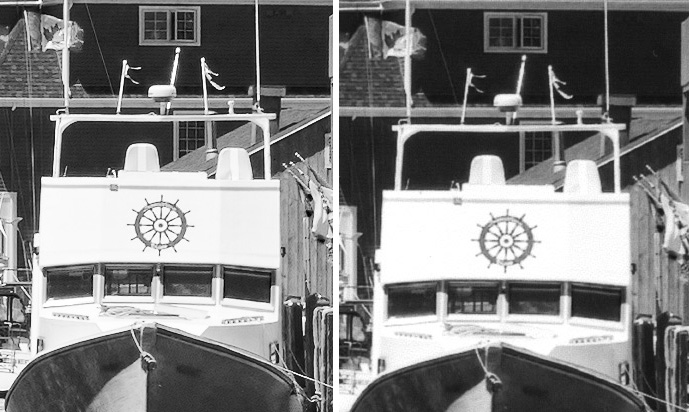
Here's a comparison of pixel-for-pixel images from the D800E (left) and Leica M9 (right), both sporting 24 mm lenses, but taken at different times. The angle of the sun is quite different. It appears that the D800E has a clear resolution advantage. The building siding is (just) resolved with the M9, although that is very hard to see here. On the other hand it looks as if the Leica might have a lens contrast advantage. Note also that there is some slight moiré visible in the siding in the case of the D800E, but not enough in this particular case to trouble a b&w print.
I set out to compare my M9 and the D800E images in black and white. I expected the D800 to be a clear winner. First I tried comparing images of similar subjects already taken with the two cameras - as illustrated above. I came to some initial conclusions, but my conscience dictated that I needed to do side-by side testing.
When I went back to make the side-by-side comparison, the sun was where it was for the M9 photo: the building siding is in shadow. Even with the Nikkor set to 28 mm (vice 24 mm) the lines in the siding are just barely visible in the digital on-screen image at left. (I picked 28 mm because with the Leica, the siding was at least resolved at this focal length, whereas it was very marginal at 24 mm.) On the right is a scan of the equivalent 16 by 20 in print: effectively the siding is not resolved in a print from either camera, even with the lens at 28 mm! I have not shown you the M9 results, but the printed result was essentially identical to D800E print shown here. The D800E held no clear advantage in the printed b&w result over the M9 under these lighting conditions!
To make a long story short, once the side-by-side images were converted to b&w and printed on my Epson 3800, it was pretty much a dead heat. Yes, the D800 images often had higher resolution on screen, but the final prints held portions very slightly favouring the Leica and other portions favouring the Nikon. I eventually came to the conclusion that the printer was usually the limiting factor; the printer was effectively applying a filter that equalized the test. Explaining that one will be the subject of Part III. At the end of the day I was left with the irony that my best images from that one day of testing came from my Leica M8 in infra-red mode! My best images came from a 10 megapixel camera, not an 18 megapixel unit or even a 35 megapixel camera! It was more about tonal rendition than sharpness or texture in this prticular case.

This snap of Cape Jourimain New Brunswick was taken with the 24-70/2.8 at 24 mm and f/7.

The people on the beach near the center of the photo are rendered nicely, but the lighthouse is clearly out of focus.
Through the course of this comparison I gained high respect for the 24-70 Nikkor: when it was in focus the images were beautifully formed at any focal length or aperture. It was wonderful! And yet I was experiencing unexpected failures: the corners at 24/2.8 could one time be just fine and at other times unacceptable. Above I show you what I regarded as the biggest disappointment: a landscape taken at 24 mm and f/7. I had carefully used the central AF sensor to focus on the lighthouse, then re-composed and pressed the button. The lighthouse was rendered very poorly in the final image. I thought I must have jerked the camera, but no, there are beautifully rendered people walking along the beach. In general it seemed like a lens decentering issue: things were sharper on the left side of the image than on the right. I initially thought the same was happening in a number of other images also. Then, just for fun, I decided to try using the camera and lens in DX (cropped format) mode. Those results seemed to be sharper on the right than on the left – backwards! How can I explain this?
After a fair bit of testing, I discovered the problem. This 24-70 mm lens has a far-from-flat field. Where the lens is really focused is very hard to predict. Using the center AF point of the camera, the image is great at any aperture or focal length over an image circle about 12 mm in diameter. Outside of that circle, it’s seemingly a guessing game. Where the focus really lies (outside of that central area) depends upon the aperture set (focus shift on stopping down) and the focal length set. In one test of focus shift, I found that at 24 mm, the lens needed to be focused at 2 meters on the distance scale in order to render sharply an object at infinity located in the corner of the frame. Stopped down to f/11, the focus needed to be reset to 7 meters. Change the focal length to 28 mm and it’s less severe but still a problem. I have yet to do an all-points survey! The non-flat field could easily persuade one that changing the selected AF sensor changes the focus – it does with this lens! But it is the lens, not the AF sensor, causing the issue. In the end I concluded that the left-right sharpness issue really depended simply upon what I had chosen to evaluate and where it happened to lie in relation to the lens' surface of sharp focus.
The good news is that this lens can produce a great quality image at any aperture and focal length and anywhere in the frame – just not all at once. If a particular object in a scene needs to be sharp, focus on it using either a close AF sensor point, or using live view. Just don’t recompose the image after you have set the focus. The other alternative is to stop down to f/11. The field is reasonably flat by f/11 and the lens becomes suitably well-behaved. On the D800E, the image contrast will be slightly degraded by f/11, but still eminently useable. At f/8 the focused image will have slightly better contrast than at f/11, but minor focus failures are still possible. At f/7 – well, you saw the example above.
Overall, this lens is probably deserving of the three and a half stars given to it by Photozone.de. If you understand how to use it, it will serve you well. At its best, it is a good match for the D800. I would rate it as better than the equivalent Zeiss lens for the Sony-Minolta cameras – which I would have trusted only in the 40-55 mm focal length range. (The corners were never sharp outside that range for the rented example of the Zeiss lens I tested.)
In general , I concluded that the camera body and sensor were quite capable of delivering digital images of a very high standard. As others have observed, the camera has very low shadow noise. Recovery from a three-stop under-exposure is easy: the result will have about the same shadow noise as most other cameras at full exposure. The on-screen, pixel-for-pixel images are often superb, lust like the Leica M9 images. On the other hand they are sometimes not. I don’t think the fault lies with the sensor. I’d love to have that sensor in the Leica.
There were still things in my images I could not explain. I still encountered image softness where I didn’t expect it. Up until now, I had had lens distortion correction switched on permanently. But I had also read in the Digital Photography Review report of the Fuji X-Pro-1 that distortion correction may cause issues. Sure enough, in one particular image that had unexplained softness, I turned off distortion correction in Camera Raw and the image improved significantly. I experimented with lateral colour correction also. Yes, in some cases I had to choose between having three different sharp coloured versions of a small detail, or a properly-coloured single but softly defined version. Generally I thought the colour-corrected version was the only real choice, but the consequence was image softness. So, while Camera-RAW or in-camera distortion correction and colour correction are great, there may be a price to be paid in terms of image definition. Even in this day of software image correction, getting things right with the lens design is still a better answer. Using more pixels than we otherwise “need” should also help – hence my vote for a 120 megapixel 35 mm camera, even if the final result no better than using the D800E with a top-notch lens.

Here's another of my test images, but even before doing a conversion to b&w, I discovered a problem.


Here's one of the problems - note the outline around some of the edges. At left is the NEF file opened in Camera Raw 6.7 with Fill set to 62. At right is the same file opened with Fill set to 0, saved as a TIFF file then the TIFF opened in Camera Raw 6.7 and the Fill then set to 62 (with no other changes). It appears Camera Raw 6.7 has problems dealing with NEF files, at least where the Fill function is concerned. Camera Raw 7.1 didn't have this problem, but was unable to completely eliminate chromatic aberrasion, leaving some colour fringing.
Some of my images had strange artifacts. They tended to look like sharpening artifacts – halos around objects – but turning off all sharpening did not get rid of them. I learned that one of the effects appeared only with the colour-to-b&w conversion, but the other was more elusive. It turns out the effects seem to be associatesd with how Camera-Raw and/or Photoshop select areas for adjustment. In the b&w conversion process, for example, image areas are selected based on colour for adjustment to their luminance. Sometimes, thin areas along a boundary seem to fall in no-man’s land: at a red-blue boundary, there may be a thin strip that is considered neither red nor blue and hence, except for desaturation, is left out of the conversion process, forming a line where the boundary was. Further investigation showed that the same sort of thing could happen with the “fill light” action. Furthermore, the magnitude of the effect seemed to depend upon what type of file I was working on. The effect was worst when working in Camera RAW on NEF raw files. Converting the files to TIFF before applying the identical adjustment might reduce or even eliminate the detrimental effect. Furthermore doing the same b&w conversion in Photoshop and in Camera-Raw can yield different results. It boggles the mind! There seem to be just too many things that can go wrong! Back in my film days I used to wish I was using glass plates! Maybe I still do! Please don’t misunderstand. I am not claiming that these effects are always present. They are not. They may not arise at all, or may be detectable only in one very restricted portion of an image. But in my view, they can ‘destroy’ an otherwise fine image, unless manual clean-up is done in Photoshop.
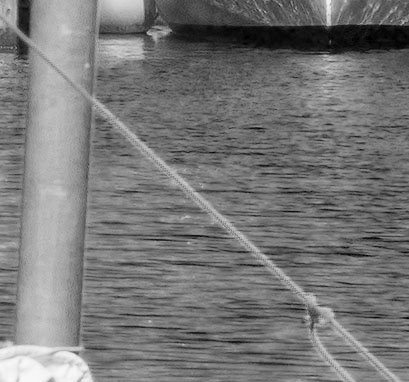
When I first did the conversion to b&w for the "successful" D800E b&w image I encountered this issue: the red ropes against the reflection of the blue sky appeared with a light outline around them. I tried several methods for the conversion, Photoshop itself, Photoshop CS5 with Camera Raw 6.7, Lightroom 4, operating on a NEF file, on a TIFF file etc. All gave slightly different results with this one being about the best I could do without manual intervention. This is Photoshop CS5 working on a .psd version of the colour file.
All of these things are phenomena I have not encountered – at least not to this degree - before. Most probably the effects have been there all along, just less noticeable when working with smaller files. Or maybe there is something about NEF files and Camera Raw. I just don’t know.
A number of you will be saying "Why don't you just use Nik Software's Silver Efex?" Just recently I did obtain a copy of the plug-in and I can confirm that it does indeed do some things very well. But it also can leave evidence of its selection methods in a manner not altogether unlike Adobe Photoshop. It can be more subtle, but it can also be quite disturbing. I have indeed found it enables me to do better with some images than I could do with just Photoshop. In the case of the one "successful" image cited in Part I, however, I could not. That may be due to my inexperience with Silver Efex.
At this time, I believe the Nikon D800E is a very fine camera, and the 24-70/2.8 Nikkor is capable of excellent images if used carefully, but I still get surprises. And there seem to be a few Photoshop-related gremlins as well. All-in-all, this much the same experience I had with Leica cameras and lenses along with Kodak Technical Pan film. Success is possible, but not easy. I have lots to learn yet.
In the next and final chapter, we’ll look closer at the ink jet printer and how it goes about erasing detail and texture!